I'm not a fan of Sunday traditions, roast dinners and The Antiques Roadshow, followed by cheese and crackers. Its all a bit depressing, although I am partial to a bit of Countryfile, hello Matt Baker ;)
I do have my own Sunday tradition though, which is the manicure. I change my nail polish all the time (every 2-3 days) but on a Sunday I go the whole hog. Nail painting is an art and badly painted nails are my biggest pet peeve. I studied Beauty Therapy and learning how to paint nails was the best thing about that year!
Follow my step by step manicure and never flood your cuticles again!
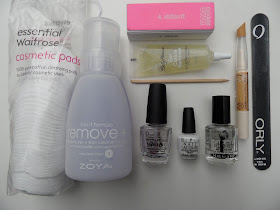
First up, gather your equipment. You will need:
Cotton wool - Pads are the best
Nail Polish Remover
4 Sided Nail Buffer
Nail File
Cuticle Remover
Orange Stick
Base Coat
Nail Polish - Any colour!
Top Coat
Cuticle Oil
1. Remove your nail polish - The most obvious step, but I know some people (Chloe) are guilty of painting over their chipped polish! This will also prep your nails and remove the natural oils from your nails, which will extend the wear of your polish. My favourite nail polish remover is the Zoya Remove +
3. Repeat step 1 - After using the cuticle gel make sure you go over each nail again with nail polish remover, just a quick swipe is needed! This will remove the excess gel and make your nail polish last longer. Its like applying foundation, if you apply your foundation immediately after you've moisturised it wont last as long. Same applies to your nails, make sure they are prepped!
4. File - Choose your preferred shape, if you have short, chubby fingers like me, go for an oval shape it will make your fingers appear longer!
5. Buff - My nail buffer is my secret weapon and will make your nail polish last all week. I always use the Models Own buffer which you can buy from Boots. The buffer has 4 sides, side 1 is a really rubbish file which I never use, so I start with step 2. buff, followed by step 3. smooth and step 4. shine.
Not only does buffing your nails make your polish last longer, it also helps reduce ridges in your nails and if you have stained your nails it will help take the stain out.
6. Base - You must, must, must use a base coat. Think of it like a primer, smoothing out the surface of your nail making your polish apply evenly. It also prevents staining and increases your polish wear. Any base coat will do, I'm currently using this OPI Natural Nail Base Coat which I really like, I would also recommend the Essie Nourish Me base coat. If you have bad ridges in your nails use a ridge filling base coat, these are thicker and will fill in the ridges.
7. Paint - I'm currently having a Buffy Summers season 1 moment and loving white nail polish. OPI Alpine Snow is my favourite white but I only have it in this diddy bottle and its basically all gone now :'( Always do 2 coats, I very, very rarely do three coats. Paint in three stripes, one in the middle and 2 either side. Remember you are painting your nails, not your cuticles or skin. The more you practise the better you will get!
8. Shine - Top coat, please don't skip it! It makes all the difference and adds shine. Its like the perfect sandwich, base coat, 2 coats of polish and top coat. The top coat seals everything in and is the final step in increasing your polish wear time. The only top coat I use is the Seche Vite Dry Fast Top Coat. A life changing product, my nails are dry within 5 minutes. I would never be without this!


9. Oil - Cuticle oil stops your cuticles becoming dry and ragged. I love Solar Oil but have just finished my bottle so picked this Almond Nail and Cuticle Oil up from The Body Shop. It comes in a handy clicky pen, so you can chuck it in your bag and apply it anytime.
Taaa Daaaaa!
And not a flooded cuticle in sight!


No comments:
Post a Comment